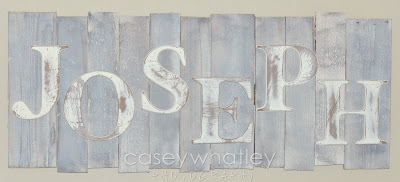
I am so excited to introduce you to my friend, Casey, a fellow mom-treprenuer from Casey Whatley Photography! Casey and I not only share a super cool first name, but we go way back to our college years at LSU and now each have two pre-school age boys.
I fell in LOVE with the wall letters she made for her boys' nursery and asked her to please please please share the step-by-step process for this super easy and inexpensive DIY project!
Lucky for us, she said, "sure!" Thank you so much for sharing, Casey!!!
Step #1: Cut the boards off of a crate. I opted to do various lengths and various angles on the edges because I wanted a rugged, non.structured look.
Step #2: Nail them onto a piece of 1x6.
Step #3: To get the look of my boards, I spray painted them gray...they were already weathered and grayish looking, but some weren't as gray as others. I spray painted them gray so they'd all look more even with the grayish weathered look.
Step #4: Then, I poured white paint in a cup and put some water in it so it gets runny. There's no set formula I used,, just make it to where the paint isn't so thick. From there, just paint the white on until you get your desired look. If too much gray is coming through, just do another coat of white.
Step #5: Next is the letters. Mine came from Babies R Us. I distressed them by hitting them with a hammer (the side you'd use to pull out a nail), and hit them with a flat head screw driver.
Step #6: I then picked out my colors...for Noah's name I used blue. The letters were already primed in white. I spray painted the letters blue and after the paint dried, I put the letters face down on my driveway and drug them on my driveway to give the paint that scratchy look. Basically, at this point you just scratch them until you get the desired look you want.
Step #7: I got sandpaper and sanded the edges of the letters down to the brown wood.
Step #8: Lastly, just nail them to your crate boards in whatever pattern you like! If your child has a long name, you could always just make a name sign that is their initials.
Thank you so much, Casey, for this super classic, rustic, and high-end look! This design can look great in many different colors and in a number of nursery themes for boys or girls! If you live in the Baton Rouge, Louisiana area, check out Casey Whatley Photography for your family, baby, child, senior/graduation, bridal, engagement, or wedding sessions!


No comments:
Post a Comment
Hi, this is Casey! Thank you for your interest in Kidspired Creations! Please leave a message below so I know that you stopped by and please, e-mail me at kidspiredcreations@gmail.com if you have any questions about my art.