kidspiration
-NOUN /KIDSPƏˈRĀSHƏN/
1. a child, group of children, or actions of a child/group of children that elicits actions or emotions or creativity in adults 
2. an event or visual reminder that stimulates youthful creativity 
3. a creation or action specifically designed for the purpose of entertaining and inspiring youth
For inquiries and orders, please e-mail Casey at
kidspiredcreations@gmail.com.
Showing posts with label Do It Yourself (DIY). Show all posts

Wednesday, January 16, 2013

DIY [No-Sew] Baby Ponchos

It's my new favorite thing!!!
I hosted a baby shower this past weekend for my sister, and my favorite thing that she got was a hand-made baby poncho!  I immediately ran to the fabric store to buy some fleece to make my own!  And let me tell you, I was able to make 6 poncho's in 10 minutes!  First try!  So super easy and inexpensive (especially since JoAnn's was having a sale on fleece).

Here's what you need:
1/2 yard of fleece (makes 3 baby ponchos)
Fabric scissors

BAM!  THAT'S IT!

Here is the step-by-step made easy!

Disclaimer:  the 6" opening is for my 8 month old's head.  Your baby might need a larger or smaller opening depending on his/her age.  Happy Crafting!

Sunday, August 26, 2012

Craft Dreams and Pinterest

Have you ever had a craft dream?  I am not always sure if I am completely asleep when I have these dreams but when I wake up I get this insane urge to craft... immediately.  And if I don't do it immediately it's as if I have this itch that just won't go away.

Well, a few nights ago, I had this dream that I turned my laundry room sliding door into a huge chalkboard!  It drove me CRAZY, but I had to wait a week to do it... you know, a little thing called LIFE got in the way of my crafting.

Perhaps I have these dreams thanks to late nights spent perusing Pinterest boards... perhaps...
Just a few coats of chalkboard paint found at the local hardware store.

I can't take credit for dreaming these next two up on my own.  I definitely found these on Pinterest...
A place for a family of 5 to place our used cups so we don't go through so many throughout the day.
A scrap of 1x6 board, drawer handles and coasters.
I first painted the board black, then painted it sea grass,
then lightly sanded the board to expose some of the black paint.
Our new prayer board.
"Pour out your heart like water
    in the presence of the Lord. 
Lift up your hands to him
    for the lives of your children..."
Lamentations 2:19

I saw this on Pinterest a while back.  My sister had actually given me a few of these frames and I decided that since I was already crafting, may as well finally do this project, especially since I already had the paper and letters as well.
Speaking of Pinterest, please follow Kidspired Creations @ kidspiredcre8!  And feel free to pin any pictures on my website... just make sure it is linking back here!  Thank you!!!

Tuesday, February 28, 2012

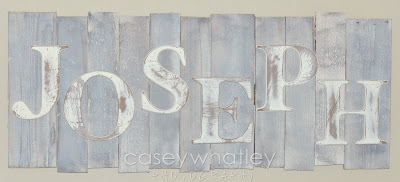
DIY Distressed Wood and Name Decor


I am so excited to introduce you to my friend, Casey, a fellow mom-treprenuer from Casey Whatley Photography!  Casey and I not only share a super cool first name, but we go way back to our college years at LSU and now each have two pre-school age boys.

I fell in LOVE with the wall letters she made for her boys' nursery and asked her to please please please share the step-by-step process for this super easy and inexpensive DIY project!

Lucky for us, she said, "sure!"  Thank you so much for sharing, Casey!!!
Step #1:  Cut the boards off of a crate. I opted to do various lengths and various angles on the edges because I wanted a rugged, non.structured look. 
Step #2:  Nail them onto a piece of 1x6.
Step #3:  To get the look of my boards, I spray painted them gray...they were already weathered and grayish looking, but some weren't as gray as others. I spray painted them gray so they'd all look more even with the grayish weathered look.
Step #4: Then, I poured white paint in a cup and put some water in it so it gets runny. There's no set formula I used,, just make it to where the paint isn't so thick. From there, just paint the white on until you get your desired look. If too much gray is coming through, just do another coat of white. 
Step #5:  Next is the letters. Mine came from Babies R Us. I distressed them by hitting them with a hammer (the side you'd use to pull out a nail), and hit them with a flat head screw driver.
Step #6:  I then picked out my colors...for Noah's name I used blue. The letters were already primed in white. I spray painted the letters blue and after the paint dried, I put the letters face down on my driveway and drug them on my driveway to give the paint that scratchy look. Basically, at this point you just scratch them until you get the desired look you want.
Step #7:  I got sandpaper and sanded the edges of the letters down to the brown wood.
Step #8:  Lastly, just nail them to your crate boards in whatever pattern you like! If your child has a long name, you could always just make a name sign that is their initials. 

Thank you so much, Casey, for this super classic, rustic, and high-end look!  This design can look great in many different colors and in a number of nursery themes for boys or girls!  If you live in the Baton Rouge, Louisiana area, check out Casey Whatley Photography for your family, baby, child, senior/graduation, bridal, engagement, or wedding sessions!

Wednesday, February 8, 2012

DIY Silhouette Wall Decor

Happy New Year (a month late)!  I have been planning this post since the new year but I just found all the pictures that I thought I lost.  Huzzah!  Still missing a bunch  though :-/

Yesterday I posted the first of a multi-part series on gift-giving in 2012: creating more personal, handmade gifts for your loved ones.

I love these silhouettes I made of my boys and my niece for my mother-in-law's Christmas gift.  This was a fun and simple project.  The hardest part was getting the kids to stay still enough to get the perfect profile shot!  I found that the best shots were the ones where their lips were parted just slightly... so after 100 shots, we finally got the perfect profile pictures (I exaggerate... just a little).

Materials:
11"x14" canvas
paint
brushes
Mod Podge
scrapbook paper
clear acrylic spray sealant
scrapbook letters
camera
computer
printer

Step #1:  First paint your canvas in a color that coordinates with your scrapbook paper.  You can paint it a solid color, or choose another coordinating color to frame it out.
Step #2:  Profile picture:  it is easier to be able to see details if your profile picture is against a light, solid background.  Upload your picture onto your computer and blow it up to fit on an 8 1/2" x 11" sheet of paper.  Print it out.
Step #3:  Once you have printed your picture out, cut out the outline of the profile.
As you can tell, I was almost out of printer ink.
Step #4:  Trace the profile onto the back of the scrapbook paper and cut it out.  Spray the clear, acrylic sealant on both sides of the scrapbook paper.  This protects the thin paper from the moisture of the Mod Podge so it will not tear easily.

Step #5:  Bust out the Mod Podge!  Paint an even layer of Mod Podge onto the middle of your canvas and another on the back of your scrapbook paper profile.  No need to be stingy, but don't glop it on either.  Place your profile picture in the middle of your canvas.  Using a credit card or clay roller, smooth out from the middle to the edges.  Keep rolling until it is completely smooth and there aren't any bubbles.  Wait about 15 minutes for it to dry.

Step #6:  When your first layer to glue your profile to your canvas is dry, add a second even layer of Mod Podge on top of your entire canvas to seal it.  Place your scrapbook letters on your canvas before the Mod Podge dries.  Even if your letters are self-adhesive, the Mod Podge will give them a permanent hold.
Aaaand you're done!  Well, after you wait 15 to 20 minutes for it to dry, but THEN you're done!  Just add a frame or decorative ribbon to hang it and it makes the perfect personal gift from the heart!

Tuesday, February 7, 2012

Season of Handmade Giving

With the growing popularity of Pinterest, a website designed for you to create virtual bulletin boards of your favorite internet finds with back links to the picture's original URL, gift-giving and decorating has made a shift into the world of DIY (do it yourself).  I LOVE making gifts for people, which is kind of how Kidspired Creations got started.  I find it is (1) cheaper if you just make something yourself and it (2) means a little bit more to the person when you put a little time and energy into making their gift.

Now if you feel you are not the crafty type, do NOT be afraid to take a small step into the DIY world!  You, too, can be crafty I promise!!!  For the next few posts I will show you some past DIY gifts that my sister and I have made.  Some are more difficult than others, but think about ways that you can adapt this to your crafting style.  When I see a new DIY craft, I first like to look at what materials are needed and try to tweak the project a bit so I can work with what I already have... to save money and a trip to the store, of course.

I recently walked around my mom's house and took pictures of the decor my sister and I have made for her over the years.  She LOVES when we make her gifts... and most often requests home-made gifts from us... and like a typical mom proudly displays them on her walls.

DIY Picture Matte
You can purchase a blank picture matte of any size from any craft store (hint: some frames come with white ones already).  Stores like Hobby Lobby will custom cut the matte for you if your frame is not a standard size.  Hand the paint and brush over to your kids and let them paint away!  For my mom's mattes I gave my kids 3 colors that I knew would match my mom's decor.

DIY Clothesline Frame
My sister found this beautiful old frame that has been in the family for a while.  She removed the backing and created horizontal "clotheslines" out of wire by using small nails or staples on either side of the frame and tying the wire between them.  She then printed her favorite pictures from my parent's wedding, my wedding, and her wedding. 

DIY Necklace Holder
Handy women of the world UNITE!  Super simple if you know how to work a drill and a bolt cutter.  This particular plaque came from Hobby Lobby.  Dab some paint on it and to make it a little more rustic, gently sand the edges to make the natural wood color show through.  These knobs came from Hobby Lobby and World Market.  Drill a hole through your plaque, screw in your knobs and use a bolt cutter to cut the excess screws so they don't stick out the back.

Shadow Box for 3D Memories
I purchased this shadow box at Hobby Lobby to display my sister's and my Christening gowns.  I screwed a little hook into the top to hang the gown from and used double sided tape for the hat, bib and shoes.  If you find a good frame sale, this is a super cheap project!

DIY Decorative Hooks
Michael's, Hobby Lobby and Joann's each sell different types of unfinished wood products that are just waiting for you to add a personal touch.  This plaque came with the knobs already attached so all you need to do is paint!

DIY Family Tree
This one is so easy a child can do it!  I painted a simple tree on a 11x14 canvas and my 4-year-old son made the leaves with his finger prints.  I then added our family names, a birdhouse - a special way my family likes to remember my dad, and my parent's wedding anniversary date.

An Original Painting
My mom requested a Casey original to hang above her bed.  Now I am not the best painter of landscapes or anything realistic, really... I try to stick to kidspired doodles and polka dots ;-)  However, I did try my hand at a swamp landscape for my mom and she and I both love how it turned out!  It doesn't matter how good you are at painting, try a simple design or pattern to put on a canvas and you might impress yourself!  I think I need a lot more practice, and maybe some painting lessons, before I'm ready to hit art galleries!

Coffee Table Picture Top
This personalized project is only semi-DIY.  This coffee table has been in my family for a few generations.  Over the years, it has acquired some not-so-pretty kicks and water spots from not using coasters.  My sister and I decided to finally make this sore sight a fun conversation piece!  First I printed out pictures of my boys, my mom's grandchildren.  I took the pictures to the Hobby Lobby framing department and gave them the dimensions of the table and all of my pictures.  In just an hour they had cut a custom matte with openings for all the pictures that fit perfectly inside my mom's coffee table.  My sister then went to a glass store and had glass cut to fit the table.  It looks AMAZING in her living room!

Stay tuned for more DIY projects that made great Christmas presents for my family and friends!

P.S. I would LOVE for you to follow me on Pinterest:  username KidspiredCre8!  And feel free to "pin" any of the pictures you see on my blog, just please make sure that it links back here and not to a generic search engine.  Thanks!!!

Saturday, February 4, 2012

DIY: [Almost] No-Sew Personalized Car Mat

I am on a hand-made present kick this year.  Well, it started around Christmas time, but it's carried on into the new year.  Tomorrow we are headed to celebrate our buddy Broden's 4th birthday!

When choosing a gift for Broden, I thought, "What would my 4 year old son like?"  I ventured up and down the craft aisle at Wal-Mart until I brainstormed this super fun idea that my son is now dying for me to make for him!

I bought 2 yards of green felt (which was way too much), 1 yard of black felt, and 1/4 yard of Cars print material (my boys picked it out, of course).  You will need some super thin yellow ribbon for your dashed road line.  I bought a roll and have a lot left over.  We also found some super fun Cars print ribbon that I figured I'd just find a use for.

Because I was making this up as I was going along, I didn't use standard forms of measurement.  For example:

Step #1:  Find the nearest large Raisins box, or object that just so happens to be the perfect width for your letters.  Lucky for me, that is what I first caught sight of, so bingo!  Step #1 complete!

Step #2:  Use the object to make sure all of your letters are the same width and trace/draw your letters out using a white colored pencil or piece of chalk onto your black felt.  Make sure they are all connecting in some way because otherwise, how are your cars going to drive from letter to letter?  See?  I'm thinking like a 4-year-old.

Step #3:  Iron your material.  Ok... that should have been Step #1 because my chalk line disappeared when I ironed.  Lesson learned.

Step #4:  Cut your letters out and lay them on your green felt.

Step #5:  I used a spray-on adhesive to attach the letters/road to the green felt to ensure that the sides and corners would not come up easily.  Please do this outside, this stuff is stinky!  Oh, and p.s. it's REALLY tacky so you're going to get little felt fibers stuck all over your hands.  It's a lot easier to wash off if you wait for it to dry first.  Second lesson learned :-)

Step #6:  Cut small 1/2" strips of the thin yellow ribbon for your dashed road lines.

Step #7:  Use fabric glue to stick all of your dashes in the middle of your road.  I suggest laying them out first and then gluing to make sure the spacing looks right.

Step #8:  It's pocket time!  My boys picked out a pack of 3 cars for Broden so I decided to make a pocket large enough to hold them.  I used the cars to figure out how large my pockets needed to be, then assumed they would need another inch on either side of them.

Step #9: "Hem" the edges using the fabric glue (or if you're cool and have a sewing machine and even COOLER if you know how to use it, then by all means, do that).

Step #10:  Attach the bottom of your pocket to your green felt (once again, using the fabric glue).

Step #11:  Space the cars out evenly.  Between each of the cars pour a line of fabric glue which will create individual pockets.  Do not seal the top of the pocket!  It will no longer be a pocket if you do so!


Helpful Hint:  Do this project when your 2 year old is sleeping.  However, if my godzilla monster had not come through and yanked the cars out of the pockets, I would not have realized it is best to sew the pocket onto the felt.


Step #12:  Thanks to the above helpful hint, there is a step #12.  HAND SEW the pockets to the felt.  By all means, if you're cooler than me and have a machine, please don't hesitate to use that instead.

Look at that fine stitching job!  

Ok now stop here, take a break, go do a few things around the house for a few hours to allow the glue to dry.

Admire your work :-)
Step #13:  Once your mat is completely dry, roll it up starting at the end opposite of your storage pocket.  Take your super cute Cars print ribbon and decide how much you will need to wrap around your roll and tie in a knot (or bow).  See how nice and compact our mat is now?

Step #14:  Find the center of your ribbon and SEW the center of the ribbon to the edge of your mat on the underside.
Congratulations!  We did it!  Now, I guess I better go get started on one for each of my boys since they can't stop talking about Broden's.

Happy Birthday, Broden!

Wednesday, January 18, 2012

DIY: Closet Campout (No-Sew!)

My husband just transformed our hall, open-the-door-and-everything-falls-on-top-of-you closet into our new GAME closet!  He added a few shelves and we cleared everything else out, threw all of our games in, and what was left?  Just our vacuum and carpet cleaners!  Those are the only things to go in the bottom of the closet, and when they aren't in there, it's my boys' favorite place to play.

I decided to turn this new play place into a secret campout!  My gift to you is this:  the easiest DIY project ever!

Drumroll.............
Tadaaaaaa!  The perfect closet campout!
Materials:

  • 1 yard of fleece material
  • Shower tension rod
  • 1 pk. shower curtain rings with clips

Step 1:  Cut a vertical slit on one side of your fabric for the door at least 18 inches from the side.  The slit I made is a wee bit shorter than my 4 year old.

Step 2:  Cut a window out on the other side (at least 18 inches from the other side and slit you made for the door).

Step 3:  Don't bother sewing these, the fleece doesn't fray.  So, I guess this isn't really a step.

Step 4:  Attach shower rings with clips to your tension rod and clip your fabric to the rings.

Step 5:  Fit tension rod into the space.  Make sure the fabric just barely touches the ground.

Step 7:  Surprise your kids with an awesome "closet campout!"


Friday, October 28, 2011

$10 Garage Sale Find

I love garage sales.  Most often I don't necessarily NEED the items I pick up, but they are super cheap and add some cute decor around the house that, if bought from a store, would have cost a pretty penny.  My last garage sale find was this brown wicker outdoor coffee table in great condition (well, it was and still is missing a glass top, but I will get that later). 

My friend Jessica spotted the same coffee table too but she assured me we wouldn't need a smack down fight over this great find... she let me get it :-)  However, she challenged me to repaint it something bold and fun!  Sounds right up my alley! 
 
 
I chose an Aqua Blue for my newest patio addition and it doesn't match a THING (but that's why I love it).  Thought I'm not ready to tell the hubby just yet, now that my coffee table is aqua blue, I'm thinking some fun colored seat cushions for the black wrought iron furniture that I already have.  See?  This project is now starting to cost some major dinero.  It definitely brightens up the space though :-)  Thanks, Jessica!!!

Monday, August 8, 2011

DIY: Decorative Metal Storage Bins

Well, it's final.  The baby crib is packed away!  My younger son is in a big boy bed so it was time to say "adios" to his baby days!  I didn't shed too many tears, though, because FINALLY we had a place to put TOY STORAGE in the boys' room!  And this made me GIDDY...

Until our "help" arrived...
They made things a little challenging.

But we finished!  It only took about 3 times as long to put everything together...
Yikes!  This is pretty and everything, but I have filled up all the metal bins already and there is still a playroom full of toys that need to find a place to live.  Back to the store to buy more white bins...
$2.50/bin at Target.  Beats the $6.99 for the cloth storage bins.
I think 19 should be enough.  (This is a pretty good sign that your kids have too many toys).  I don't like how the white bins blend in with the white shelves, so being the color nut that I am, I decided to have a little fun with spray paint.
  
Add caption
1.  Tape the parts that you want to stay white.

2.  Put paper or plastic inside so the paint doesn't spray through to the other side.

3.  Put a string through the holes to hang the bins while you paint.
4.  Hang the bins far from your house, concrete, anything you don't want to turn the color of your paint.
TIP:  Paint WITH the direction of the wind so you don't get paint in your face.  Lesson learned.
Another TIP:  Spray in quick swiping motion because if you spray too long in one spot, the paint gathers in the holes.  Lesson also learned.
One more TIP:  Do not drop a freshly painted bin on your pants.  Paint does not come off.  Lesson, apparently, not learned because I did this several times. No damage to the bins though, so I win.
Yes, this is the Car Wash from James' birthday party.
Ok, painters tape is AWESOME and LSU and OU have pretty easy letters to make.
Now let's see how long this room will stay clean... ::sigh:: I at least got a few nice pictures of it!

Looks great in their room with their new bunk beds!
I didn't get a picture with all of the painted bins, but you get the idea.
Related Posts Plugin for WordPress, Blogger...